Pages


Saturday, December 21, 2013

Knit Your Own Hair-bows!

What girl doesn't love hair accessories? None that I know. Unfortunately for me (and other accessory loving ladies) I definitely do not have unlimited wealth with which to buy such accessories. Which is why I love to make them when I can. Like these hand-knit hair-bows:

These lovelies, inspired by Pinterest, are sure to make great Christmas gifts for my three (yes, THREE) younger sisters. 

Here's how I made them:

1) I cast ten stitches onto a pair of smallish knitting needles.
2) I knit until I had a strip approximately six inches long.
3) I cast off and sewed the two ends (the skinny ends, not the long ones) together.
4) I wrapped  a piece of yarn around the middle of the folded strip to cinch it.
5) I sewed the back of the bow onto a hair elastic. 
Easy right?! And after following these simple steps you have a chic (and utterly inexpensive) new hair accessory!


Check them out on Pinterest!


Red Velvet Pinwheel Cookies

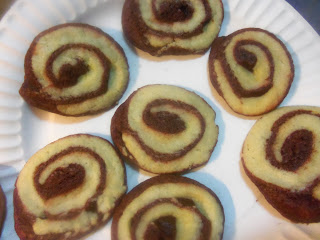
I'm often surprised by how delicious the recipes found on the back of cereal boxes or cookie mixes can be. For instance, the red velvet pinwheel cookies I recently made based off a recipe on the back of a box of Pillsbury Sugar Cookie Mix.
In addition to detailing the creation of these delectable and beautiful cookies, the box also gave a recipe for cream cheese frosting to spread between two cookies. Unfortunately, I had no time to make the frosting (I'm busy!) I'm sure it would taste great though! 

Conveniently, the recipe for these tasty treats can be found on the Pillsbury website (they also have a picture which shows cookies that look far superior to mine.) Even more conveniently, I have decided to provide the link to that very website in this blog post.

So basically, there's really no reason to NOT make these cookies. They're easy, eye-appealing, and delicious! Plus, they're perfect for Christmas!
Check 'em out on Pinterest!


Wednesday, August 7, 2013

Awesome Harry Potter Birthday Cake!

Awesome Harry Potter Birthday Cake

My twelve-year-old sister has an obsession. It's an obsession that I, as well as the majority of the human population, shares. In fact, the thing she obsesses over is probably one of my favorite things, aside from perhaps eating and sleeping. Have you guessed what the obsession is? I'll give you a hint: It's the best book series. Ever. 

Honestly, who doesn't have a Harry Potter obsession?


When my sister's birthday rolled around, nobody was surprised when she requested a Harry Potter birthday cake.  What did surprise my family was that we were actually able to create a cake that bore some resemblance to the famed book series. Obviously the easy way to honor my sister's request would be to but a cake, but in our family we absolutely refuse to buy birthday cakes. It's pretty much a cardinal sin. 

Now, being an exemplary specimen of an older sister, I volunteered to make Grace's birthday cake. Here's how it came out: 

Surprisingly, the cake was pretty easy to make. I simply made a batch of confetti cake batter by using a boxed mix (yes, cheating, I know!) and baked it in a princess castle cake mold that we had hidden away somewhere from an earlier birthday. Once the cake was baked I made some homemade buttercream frosting, colored it with purple food dye, and frosted the "Hogwarts Castle." I also made a batch of yellow frosting which I used to frost the turrets and the ice-cream cones we used to give the cake some dimension. While the cake was still baking, I went onto Google and printed out a bunch of Harry Potter cartoon characters. I cut these out and taped them to toothpicks which I later stuck on the cake. I also added some vanilla wafer cookies, pretzel M&Ms, and generic Lucky Charms cereal to embellish the cake.

The fruit of my labors was a beautiful cake that was a hit with the twelve-year-olds, tasted delicious, and was actually quite easy to make. Even yelling "Acio birthday cake!" would not have produced better results!


See it on Pinterest 

Monday, April 29, 2013

DIY Glamorous Jean Fashion Wrap Bracelet

Stylin' Wrap Bracelet
A few weeks ago I was at the mall and one of my friends bought a really cool leather wrap bracelet. I loved it, but I was pretty sure that I could make my own. Turns out, I was right! Here's how I did it:

1) Cut the hem off of some sort of jean material ( I used the hem of a toddler's jean dress)

2) Using a glue gun, add some sort of beads, studs, or gems.

3) Using left over jean hem, make a small loop and glue it to one end of the bracelet.

4) Add something to the other end that fits through the loop and will hold the bracelet to your arm (the beads I glued on were large enough so that I just pulled one of them through the loop and that was enough to keep it on)

5) Wear your new fashion accessory and bask in the compliments you're sure to receive :)

Saturday, April 13, 2013

How To Decorate Your Own Mug


"Bling-Out" Your Beverage!

I'm an avid tea drinker. I love the feeling of holding a steaming mug of aromatic tea in the morning. So, when my mom accidentally broke my favorite mug, I was heartbroken (ok, maybe that's a slight overstatement.) Luckily, I saw a post on Pinterest that showed how to decorate your own mug.
It was so simple that I had my doubts, but after I tried it out, I found the results to be most pleasing.


All the materials you need are:

                -A plain coffee mug
-Sharpies
-An oven


The mug I saw on Pinterest was made with just a plain black sharpie. Since my family adores all things sparkly, I was lucky enough to have some shiny metallic sharpies which worked great! All I did was draw on the cup with the sharpies and then bake it in the oven at 375 degrees for about thirty-five minutes. 
\
Now I have a stylin' mug to drink my daily tea out of! Plus, I think I may actually prefer this one to my original mug! ;)


Check it out on pinterest!


Tuesday, March 26, 2013

Classy Braid-Wrapped Ponytail

Classic Braid-Wrapped Ponytail


Do you ever find yourself feeling frazzled in the morning?

Is your hair ever incredibly obstinate?

Want a simple, effortless hairstyle that manages to still look chic?

Try this easy braid-wrapped ponytail! It may look sophisticated, but is really easy to do!

Here's How:
1) Pull your hair into a low ponytail, slightly to the side. 2)Leave a small amount of hair underneath out of the ponytail.
3) Braid the hair underneath. Tie off with a small elastic.
4) Wrap the braid around the ponytail.
5) Tuck the end of the braid into the underside of the ponytail.

It's on Pinterest too!


Sunday, March 24, 2013

Make Your Own Soft Pretzels

Make Your Own Soft Pretzels
Why go to the mall? You can easily make your own soft pretzels at home! I tried these out with my friend and was thrilled with the results.

Ingredients:
-4 to 4 1/4 cups flour ( I used 2 c. whole wheat and 2 1/4 c. white)
-1 packet yeast
-2 cups warm water
-1 egg
-1/2 stick butter
-2 tbsp sea salt (regular salt works o.k. too)
-1 tbsp sugar

To Make:
1) Dissolve yeast in warm water in a large bowl.
2) Add flour, sugar, and 1 tbsp salt to the dissolved yeast.
3) Mix the ingredients until combined. 
4) Knead the dough for about five minutes, or until it has an elastic consistency.

5) Break off chunks of dough and roll between your hands until you have a long strip of dough.
6) Shape into a pretzel.
7) Meanwhile, melt the butter in the microwave. Mix it with the egg.
8)Dunk the pretzels in the butter/egg mixture. Lay on baking sheet and sprinkle with salt.

9) Bake at 350 degrees in the oven for 5-6 minutes. 
10) Turn the oven to broil and cook for another 4-5 minutes.
11) Serve warm with the sauce of your choice.

I made a honey mustard sauce by combining 1/2 cup dijon mustard and 1/3 cup honey. It complemented the pretzels nicely. :) Enjoy!


Check it out on Pinterest!


Sunday, March 17, 2013

Holiday Pumpkin Coffee Cake: recipe courtesy of Jiffy Mixes

Pumpkin Coffee Cake

I found the recipe for this coffee cake in the Jiffy Mix Recipe Booklet. I ordered the booklet for FREE in the mail. Get yours here at

This recipe caught my eye and I knew I HAD to make it. Who doesn't love coffee cake? Even coffee haters like me adore the aroma of cinnamon sugar when a moist, golden brown coffee cake is in the oven. Yum! 

Here's how my creation came out. And yes, it tastes as good as it looks!

 Below is the recipe, courtesy of Jiffy Mixes. If the image is too small to see, you can find a link to it here
http://www.razzledazzlerecipes.com/coffee-cake-recipes/pumpkin-coffee-cake.htm or else you can always order the booklet like I did. Enjoy your luscious pumpkin coffee cake! :) 


The fun continues on Pinterest! Check out this recipe and other fun stuff by following this link!

Monday, March 11, 2013

Do It Yourself: Legwarmers

Do It Yourself:
Legwarmers

I have ballet class every Wednesday. Generally, this involves a scramble to get myself ready. Usually, I wind up pawing through our dance costume box and wildly throwing on the first thing I find. Most of the time I don't wear legwarmers. 
Until now.

It's not that I ever had anything against legwarmers. In fact, I love them! I just could never find any because I only had a few pairs. This problem is now solved because I have learned how to make my own legwarmers. 

All you need is an old sweater and some scissors. Simply cut off the arms and voila! You have a cute new accessory and a short sleeve sweater! A two in one deal.


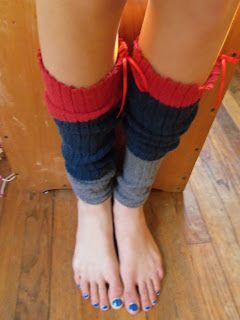
                                          Here's how my first pair came out

Below is my second pair.
Since I'm lazy and don't have a sewing machine, I didn't hem them. I just made a really clean cut. But if you're more detail-oriented, then hemming your legwarmers is probably a good plan. You could also add ribbon or buttons to jazz them up. I added ribbon bows to my red pair.

They're on pinterest too!


Sunday, March 10, 2013

Broccoli Mozzarella Bites

Broccoli Mozzarella Bites

Eating your veggies never sounded so exciting! Although I'm a broccoli fan to begin with, I feel confident that even skeptics would enjoy this crisp, flavorful treat. Broccoli mozzarella bites have just four ingredients and are a tasty way to incorporate broccoli into your meal.

Ingredients:
-1 package frozen chopped broccoli
-3 eggs
-1 cup breadcrumbs
-1 1/4 cup mozzarella cheese
-1/4 cup water

To Make:
1)Mix all ingredients together in a bowl
2)Shape mixture into patties
3) Place on greased baking sheet
4) Bake at 350 degrees for 30 minutes, flipping once.


Yum!

Check it out on Pinterest!
http://pinterest.com/pin/472385448384738408/